Have you ever noticed smudges or dust specks ruining the clarity of your photographs? Keeping your camera lens clean is not only essential for capturing stunning images but also for prolonging the life of your equipment. In this guide, we’ll walk you through the process of cleaning your camera lens effectively, ensuring that your photos always turn out sharp and clear.
A clean lens is the window to a world of sharp and vibrant photographs.
Understanding Camera Lens Cleaning
Before delving into the process of cleaning your camera lens, it’s crucial to grasp the significance of maintaining a clean lens. A camera lens serves as the gateway through which light enters to create an image, making it a pivotal component in the photography process. When the lens is contaminated with dust, dirt, or smudges, it can significantly impact the quality of the photographs produced.
Firstly, different types of camera lenses exist, ranging from prime lenses to zoom lenses, each with its unique design and specifications. Understanding the specific characteristics of your lens is essential in determining the most suitable cleaning methods and products.
Moreover, various contaminants can accumulate on the surface of the lens during regular use, including dust particles, fingerprints, and moisture droplets. These contaminants not only obscure the clarity of the lens but can also affect its performance over time if left unaddressed.
Furthermore, neglecting to clean your camera lens regularly poses risks to both the lens itself and the quality of your photographs. Dust and dirt particles can scratch the lens surface, leading to permanent damage and reducing its effectiveness in capturing sharp and vibrant images. Additionally, smudges and fingerprints can cause unwanted reflections and distortions in photographs, detracting from their overall quality.
In essence, understanding the importance of camera lens cleaning is the first step toward maintaining optimal photographic results. By recognizing the various types of lenses, identifying common contaminants, and acknowledging the risks of neglecting lens maintenance, photographers can appreciate the significance of incorporating regular cleaning practices into their photography routines.
Essential Tools for Cleaning a Camera Lens
Cleaning your camera lens effectively requires the use of specific tools designed to remove dirt, dust, and smudges without causing damage to the delicate lens surface. Here’s a detailed look at the essential tools you’ll need to maintain the cleanliness of your camera lenses:
- Lens Cleaning Solution: A high-quality lens cleaning solution is a fundamental component of any lens cleaning kit. These solutions are specially formulated to dissolve oils, remove smudges, and lift dirt particles from the lens surface without leaving streaks or residue behind. When choosing a lens cleaning solution, opt for one that is alcohol-free and designed specifically for use on camera lenses to ensure compatibility and optimal results.
- Lens Cleaning Cloth: Microfiber cloths are the preferred choice for cleaning camera lenses due to their soft, lint-free texture. These cloths effectively lift dirt and grime from the lens surface without scratching or damaging the delicate coating. When selecting a lens cleaning cloth, ensure it is clean and free of any debris that could scratch the lens. Additionally, consider keeping multiple cloths on hand to avoid cross-contamination between lenses.
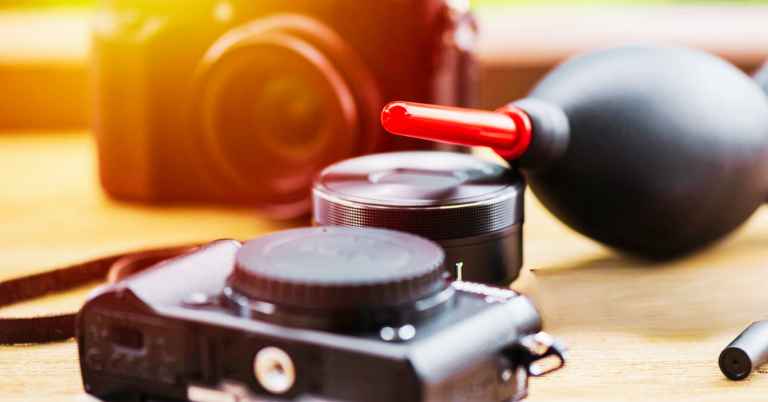
- Lens Blower: A lens blower, also known as a lens brush or air blower, is an essential tool for removing loose dust particles from the lens surface before cleaning. By gently directing a stream of air onto the lens, a blower can dislodge dust and debris without the risk of scratching or damaging the lens. Look for a blower with a soft, non-abrasive tip to ensure safe and effective cleaning.
- Lens Brush: A lens brush is another useful tool for removing stubborn dust and debris from the lens surface. These brushes feature soft bristles that gently sweep away dirt without scratching the lens. When using a lens brush, exercise caution to avoid pressing too firmly or applying excessive force, as this can potentially scratch the lens coating. Additionally, be sure to clean the brush regularly to prevent the accumulation of dirt and debris that could transfer to the lens.
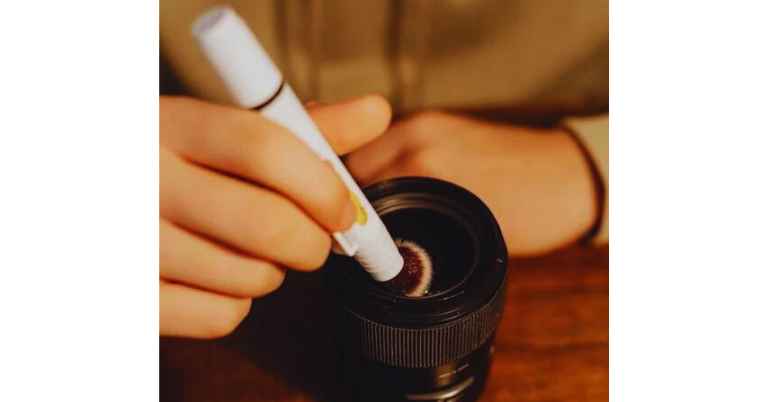
- Lens Cleaning Pen: A lens cleaning pen is a convenient tool for quickly removing fingerprints and smudges from the lens surface. These pens feature a retractable brush on one end for removing loose dust and a soft, chamois-like pad on the other end for gently wiping away smudges. When using a lens cleaning pen, be sure to use gentle, circular motions to avoid damaging the lens surface.
By equipping yourself with these essential tools for cleaning camera lenses, you can ensure that your equipment remains in top condition and consistently delivers sharp, clear images. Incorporating regular lens cleaning into your photography routine will not only improve the quality of your photographs but also prolong the lifespan of your valuable camera equipment.
How to Clean Camera Lens?
Learn the art of cleaning your camera lens with precision. Begin with essential precautions to protect your equipment, then follow a simple step-by-step process to ensure thorough cleaning, leaving your lens spotless and ready to capture perfect shots.
Precautions Before Cleaning a Camera Lens
Before embarking on the task of cleaning your camera lens, it’s essential to take several precautions to ensure the safety of your equipment and achieve optimal cleaning results. Here are some key precautions to keep in mind:
- Turn Off Your Camera: Before removing the lens for cleaning, always ensure that your camera is turned off. This simple precaution prevents accidental damage to the lens or camera sensor and reduces the risk of electrical shock.
- Handle With Care: When removing the lens from your camera, handle it with care to avoid accidentally dropping or damaging it. Hold the lens securely by the barrel, taking care not to touch the glass elements or electronic contacts.
- Avoid Direct Contact: Direct contact with the lens surface should be avoided at all costs, as oils from your skin can transfer to the glass, leaving smudges and fingerprints. If necessary, use lens caps or lens tissue to protect the lens surface during handling.
- Choose a Clean Workspace: Select a clean and well-lit workspace for cleaning your camera lens. Avoid areas with excessive dust, dirt, or debris that could contaminate the lens during the cleaning process.
- Use a Stable Surface: When cleaning your lens, place it on a stable and flat surface to prevent it from rolling or tipping over. This ensures that the lens remains secure and stable throughout the cleaning process, reducing the risk of accidental damage.
- Keep Cleaning Tools Clean: Ensure that all cleaning tools, including lens cloths, brushes, and blowers, are clean and free of dirt or debris before use. Contaminated tools can transfer particles to the lens surface, leading to scratches or damage.
- Avoid Excessive Force: When cleaning your lens, avoid applying excessive force or pressure, as this can potentially damage the delicate lens coating or glass elements. Instead, use gentle and controlled movements to remove dirt and smudges.
- Use Recommended Products: Use only recommended cleaning products specifically designed for camera lenses. Avoid using household cleaners, alcohol-based solutions, or abrasive materials, as these can damage the lens coating and affect image quality.
By taking these precautions before cleaning your camera lens, you can ensure a safe and effective cleaning process while protecting your valuable equipment from damage. Incorporating these measures into your lens maintenance routine will help you achieve optimal results and prolong the lifespan of your lenses.
Step-by-Step Camera Lens Cleaning Process
Cleaning your camera lens is a straightforward process, but it requires attention to detail and the use of proper techniques to avoid damaging the delicate lens surface. Here’s a guide to help you effectively clean your camera lens:
- Prepare Your Workspace: Start by selecting a clean and well-lit workspace free from dust and debris. Lay out all the necessary cleaning tools, including a lens cleaning solution, lens cleaning cloth, lens blower, and lens brush, within easy reach.
- Ensure Camera is Off: Before removing the lens for cleaning, ensure that your camera is turned off to prevent accidental damage to the lens or camera sensor. If your camera has a detachable lens, carefully remove it by pressing the lens release button and twisting the lens counterclockwise.
- Inspect the Lens: Before cleaning, inspect the lens carefully for any visible dirt, dust, or smudges. Take note of any stubborn stains or debris that may require extra attention during the cleaning process.
- Blow Away Loose Particles: Use a lens blower to gently blow away any loose dust or debris from the lens surface. Hold the blower a few inches away from the lens and use short, controlled bursts of air to dislodge particles without touching the lens.
- Brush Off Stubborn Dirt: For stubborn dirt or debris, use a soft-bristled lens brush to gently brush away the particles. Start from the center of the lens and brush outwards in a circular motion, taking care not to apply too much pressure.
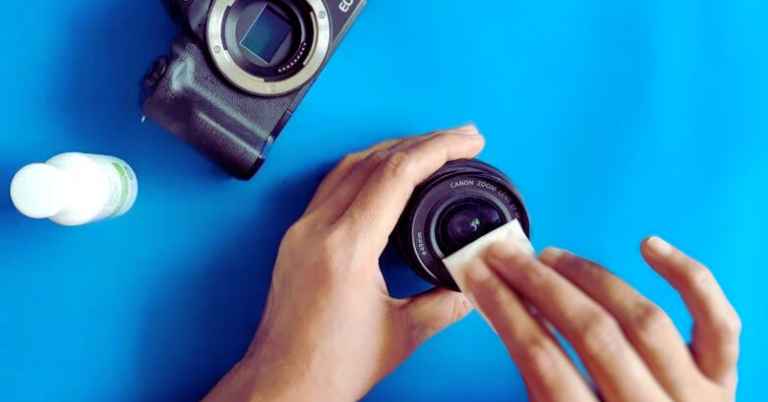
- Apply Lens Cleaning Solution: Dampen a corner of your lens cleaning cloth with a small amount of lens cleaning solution. Avoid applying the solution directly to the lens to prevent excess liquid from seeping into the lens barrel or electronic contacts.
- Wipe the Lens Surface: Gently wipe the lens surface in a circular motion, starting from the center and working your way outwards. Use light pressure and smooth, continuous movements to remove dirt, smudges, and fingerprints from the lens.
- Inspect for Residue: After cleaning, inspect the lens surface carefully for any remaining residue or streaks. If necessary, use a dry portion of the lens cleaning cloth to buff away any remaining marks or smudges.
- Reattach the Lens: Once the lens is clean and dry, carefully reattach it to your camera body by aligning the lens mount with the camera’s lens mount and twisting clockwise until it locks into place. Be sure to secure the lens firmly to prevent it from becoming loose during use.
- Store Your Equipment: Finally, store your cleaning tools in a clean and dry environment, ready for future use. Avoid leaving your camera and lenses exposed to dust or moisture, and always use lens caps to protect the lens surface when not in use.
By following these step-by-step instructions, you can effectively clean your camera lens and ensure that it remains in top condition for capturing stunning photographs. Incorporate regular lens cleaning into your photography routine to maintain optimal image quality and prolong the lifespan of your valuable equipment.
Dealing with Stubborn Stains
While basic cleaning methods can effectively remove most dirt and smudges from camera lenses, stubborn stains may require additional attention and care to ensure thorough cleaning without damaging the lens surface. Here’s how to deal with stubborn stains effectively:
- Identify the Stain: Before attempting to clean the stain, it’s essential to identify the type of stain you’re dealing with. Common stubborn stains on camera lenses include oil smudges, fingerprints, water spots, and adhesive residue.
- Use Lens Cleaning Solution: Apply a small amount of lens cleaning solution to a clean microfiber cloth. Opt for a solution specifically formulated for camera lenses, as household cleaners may contain harsh chemicals that can damage the lens coating.
- Gently Dab the Stain: Dab the stained area gently with the dampened microfiber cloth, using light pressure to avoid scratching the lens surface. Avoid rubbing the stain vigorously, as this can spread the stain and potentially cause further damage.
- Repeat as Necessary: For particularly stubborn stains, you may need to repeat the cleaning process several times to fully remove the stain. Be patient and persistent, taking care not to apply excessive force or pressure.
- Use Distilled Water: If the stain persists after using the lens cleaning solution, try dampening the cloth with distilled water instead. Distilled water is free from impurities and minerals, making it safe for use on camera lenses.
- Avoid Harsh Chemicals: Avoid using harsh chemicals or abrasive materials to clean stubborn stains, as these can damage the lens coating and affect image quality. Stick to gentle cleaning methods and products specifically designed for camera lenses.
- Consult a Professional: If you’re unable to remove the stubborn stain on your own or if you’re concerned about causing damage to the lens, consider consulting a professional camera technician for assistance. They have the expertise and equipment necessary to safely clean and restore your lens.
- Prevent Future Stains: Once the stubborn stain has been successfully removed, take steps to prevent future stains from occurring. Use lens caps or protective filters when not in use, handle your lenses with clean hands, and avoid exposing them to harsh environmental conditions.
By following these tips and techniques, you can effectively deal with stubborn stains on your camera lenses and ensure that they remain in top condition for capturing sharp and clear images. Remember to exercise caution and patience when cleaning stubborn stains, and don’t hesitate to seek professional assistance if needed.
Cleaning Camera Lens Filters
Camera lens filters are valuable accessories that help photographers achieve various creative effects and enhance image quality. To maintain optimal performance and image quality, it’s essential to clean lens filters regularly. Here’s how to clean camera lens filters effectively:
- Inspect the Filter: Before cleaning, inspect the filter carefully for any visible dirt, dust, or smudges. Take note of any stubborn stains or debris that may require extra attention during the cleaning process.
- Blow Away Loose Particles: Use a lens blower or compressed air to gently blow away any loose dust or debris from the surface of the filter. Hold the blower a few inches away from the filter and use short, controlled bursts of air to dislodge particles without touching the surface.
- Brush Off Stubborn Dirt: For stubborn dirt or debris, use a soft-bristled lens brush to gently brush away the particles. Start from the center of the filter and brush outwards in a circular motion, taking care not to apply too much pressure.
- Use Lens Cleaning Solution: Dampen a corner of a lens cleaning cloth with a small amount of lens cleaning solution. Avoid applying the solution directly to the filter to prevent excess liquid from seeping into the filter threads or affecting the adhesive on polarizing filters.
- Wipe the Filter Surface: Gently wipe the surface of the filter in a circular motion, starting from the center and working your way outwards. Use light pressure and smooth, continuous movements to remove dirt, smudges, and fingerprints from the filter.
- Inspect for Residue: After cleaning, inspect the filter surface carefully for any remaining residue or streaks. If necessary, use a dry portion of the lens cleaning cloth to buff away any remaining marks or smudges.
- Dry the Filter: Allow the filter to air dry completely before reattaching it to your lens or storing it. Avoid using heat sources or blowing on the filter to speed up the drying process, as this can introduce moisture or dust particles to the surface.
- Reattach the Filter: Once the filter is clean and dry, carefully reattach it to your lens by screwing it onto the lens threads in a clockwise direction. Ensure that the filter is securely attached to prevent it from becoming loose during use.
- Store Your Filters: Store your cleaned filters in a clean and dry environment, preferably in protective cases or pouches, to prevent dust or debris from accumulating on the surface between uses.
By following these steps and taking proper care of your camera lens filters, you can ensure that they remain in top condition and continue to deliver optimal results for your photography needs. Incorporate regular filter cleaning into your photography routine to maintain optimal image quality and prolong the lifespan of your valuable equipment.
Storing Cleaned Lenses
After completing the cleaning process for your camera lenses, proper storage is crucial to maintain their pristine condition and extend their longevity. Here’s a detailed explanation of how to store cleaned lenses effectively:
- Ensure Complete Dryness: Before storing your lenses, it’s essential to ensure that they are completely dry. Any residual moisture left on the lens surface can lead to the growth of mold or fungus, which can cause irreparable damage over time. To facilitate drying, allow the lenses to air dry naturally in a clean and dust-free environment. Avoid using heat sources or blowing on the lenses, as this can introduce additional moisture or dust particles.
- Choose a Suitable Storage Environment: Selecting the right storage environment is crucial to protect your cleaned lenses from dust, dirt, and extreme temperatures. Ideally, store your lenses in a cool, dry place away from direct sunlight and humidity. Avoid storing them in areas prone to temperature fluctuations, such as attics or basements, as this can potentially damage the lens elements or lens coatings.
- Invest in Protective Cases or Pouches: To provide an extra layer of protection for your lenses, consider investing in dedicated lens cases or pouches. These protective accessories help shield the lenses from dust, scratches, and accidental impacts while in storage. Choose cases or pouches that are well-padded and have a soft interior lining to prevent any abrasive contact with the lens surface.
- Use Lens Caps and Rear Caps: When storing your lenses, always remember to attach both the front and rear lens caps. Lens caps help protect the lens elements from dust and debris, while rear caps safeguard the delicate electronic contacts on the lens mount. Additionally, using lens caps prevents accidental damage to the lens surface and minimizes the risk of scratches or smudges.
- Consider a Dedicated Lens Storage System: If you own multiple lenses, consider investing in a dedicated lens storage system to keep them organized and easily accessible. Lens storage systems typically feature individual compartments or slots for each lens, providing a secure and organized way to store your collection. Some storage systems also offer additional features such as padded dividers, adjustable compartments, and carrying handles for added convenience.
By following these practices for storing cleaned lenses, you can ensure that your valuable equipment remains in optimal condition and ready to deliver exceptional performance whenever you’re ready to capture your next photographic masterpiece.
Frequency of Cleaning
Determining how often to clean your camera lens depends on various factors, including how frequently you use your equipment, the shooting conditions, and the environment in which you operate. Here’s an expanded explanation of the frequency of cleaning your camera lens:
- Regular Maintenance: Incorporating regular lens cleaning into your photography routine is essential for maintaining optimal image quality. If you use your camera frequently, especially in dusty or dirty environments, consider cleaning your lenses at least once a week or after every photography session to prevent the buildup of dirt and debris.
- Environmental Factors: The environment in which you shoot plays a significant role in how often you need to clean your camera lens. If you frequently shoot outdoors in harsh conditions such as sandy beaches, dusty deserts, or humid rainforests, you may need to clean your lenses more frequently to remove debris and moisture that can affect image quality.
- Usage Patterns: Your lens cleaning frequency may also depend on how often you use your equipment and the type of photography you engage in. For professional photographers who shoot daily or multiple times a week, regular lens cleaning is essential to ensure consistently high-quality images. Hobbyists or occasional photographers may not need to clean their lenses as frequently but should still incorporate regular maintenance into their routine.
- Visual Inspection: Regularly inspecting your lens for visible dirt, smudges, or other contaminants is a good practice to determine when cleaning is necessary. If you notice any debris or stains on the lens surface, it’s advisable to clean it promptly to prevent these contaminants from affecting image quality.
- Preventive Maintenance: In addition to regular cleaning, preventive maintenance measures such as using lens caps or protective filters can help minimize the frequency of cleaning. Lens caps protect the lens surface from dust and scratches when not in use, while filters can act as an additional barrier against environmental elements such as dust, moisture, and fingerprints.
- Professional Cleaning: Periodically, consider scheduling professional cleaning and maintenance for your camera lenses, especially if you notice persistent stains, smudges, or other issues that you’re unable to resolve with routine cleaning. Professional technicians have the expertise and equipment to perform thorough cleaning and inspection, ensuring optimal performance and longevity of your lenses.
By considering these factors and incorporating regular maintenance into your photography routine, you can determine the appropriate frequency of cleaning for your camera lenses, ensuring they remain in top condition and consistently deliver high-quality images.
Avoiding Common Mistakes
While cleaning your camera lens may seem like a simple task, there are several common mistakes that many photographers make, which can potentially damage the delicate lens surface or affect image quality. Here’s an expanded explanation of how to avoid these common mistakes:
- Using the Wrong Cleaning Materials: One of the most common mistakes is using improper cleaning materials, such as rough cloths, tissues, or household cleaners. These materials can scratch the lens surface or leave behind residues that affect image quality. Instead, use soft microfiber cloths and lens cleaning solutions specifically designed for camera lenses.
- Cleaning Too Aggressively: Cleaning your lens too aggressively can lead to scratches or damage to the lens coating. Avoid applying excessive pressure or rubbing the lens surface vigorously. Instead, use gentle, circular motions and let the cleaning solution do the work of removing dirt and smudges.
- Neglecting to Inspect for Debris: Neglecting to inspect the lens for debris before cleaning can result in spreading dirt or particles across the lens surface, causing scratches or streaks. Always inspect the lens carefully before cleaning and remove any visible debris with a blower or brush.
- Ignoring Proper Storage: Improper storage of your lenses can lead to dust accumulation, moisture build-up, or accidental damage. Always store your lenses in a clean, dry environment away from direct sunlight and extreme temperatures. Use lens caps and protective cases to shield the lenses from dust and scratches when not in use.
- Skipping Precautions Before Cleaning: Skipping essential precautions before cleaning, such as turning off the camera, can lead to accidental damage to the lens or camera sensor. Always ensure that your camera is turned off and handle the lens with care to avoid accidents or mishaps.
- Overlooking Lens Filters: Many photographers overlook cleaning their lens filters, assuming that they don’t get dirty as quickly as the lens itself. However, lens filters can accumulate dirt, fingerprints, and smudges, affecting image quality. Remember to include lens filters in your regular cleaning routine to maintain optimal performance.
- Using Excessive Cleaning Solution: Using too much cleaning solution on the lens cloth can lead to excess liquid seeping into the lens barrel or affecting the lens coatings. Use a minimal amount of cleaning solution and ensure that the cloth is only slightly damp, not dripping wet.
- Ignoring Professional Maintenance: While regular cleaning is essential, some issues may require professional attention, such as stubborn stains, scratches, or internal dust. Ignoring these issues or attempting to fix them yourself can potentially worsen the problem. If you encounter persistent issues with your lenses, consider seeking professional maintenance from a qualified technician.
By avoiding these common mistakes and following proper cleaning techniques, you can ensure that your camera lenses remain in top condition, consistently delivering high-quality images for years to come.
Tips for Maintaining Clean Lenses
Maintaining clean camera lenses is essential for ensuring optimal image quality and prolonging the lifespan of your equipment. Here are some detailed tips for effectively maintaining clean lenses:
- Handle Lenses with Care: Always handle your lenses with clean hands and avoid touching the glass elements directly. Fingerprints and oils from your skin can transfer to the lens surface, leading to smudges and affecting image quality. Use the lens barrel or edges to hold and manipulate the lens whenever possible.
- Use Lens Caps and Filters: When not in use, always keep your lenses protected with lens caps or filters. Front and rear lens caps shield the lens elements from dust, dirt, and scratches, while filters provide an additional layer of protection against environmental elements. Attach lens caps immediately after removing the lens from your camera to prevent dust accumulation.
- Store Lenses Properly: Store your lenses in a clean, dry environment away from dust, humidity, and extreme temperatures. Invest in dedicated lens cases or pouches to provide added protection when storing or transporting your lenses. Ensure that the storage area is free from moisture and humidity to prevent the growth of mold or fungus on the lens surface.
- Clean Regularly: Incorporate regular lens cleaning into your photography routine to prevent the buildup of dirt, dust, and smudges. Use a soft-bristled brush or lens blower to remove loose particles before using a microfiber cloth and lens cleaning solution to wipe away remaining contaminants. Avoid waiting until the lens is visibly dirty before cleaning, as this can lead to stubborn stains that are more difficult to remove.
- Inspect Before Use: Before attaching a lens to your camera, take a moment to inspect the lens surface for any visible dirt, smudges, or debris. Use a lens blower or brush to remove any particles, and gently wipe the lens surface with a clean microfiber cloth if necessary. Inspecting the lens before use helps ensure that your photographs are free from unwanted artifacts caused by dirty lenses.
- Avoid Harsh Cleaning Methods: When cleaning your lenses, avoid using harsh cleaning methods or abrasive materials that can scratch or damage the lens surface. Stick to soft, lint-free materials such as microfiber cloths and brushes specifically designed for cleaning camera lenses. Avoid using tissues, paper towels, or clothing that may contain abrasive particles.
- Protect Against Environmental Elements: When shooting in challenging environments such as sandy beaches, dusty deserts, or humid rainforests, take extra precautions to protect your lenses from environmental elements. Use lens hoods to shield the front element from stray light, rain, and wind-blown debris. Consider investing in weather-sealed lenses for added protection against moisture and dust.
- Schedule Professional Maintenance: Periodically, consider scheduling professional maintenance for your lenses to address any stubborn stains, internal dust, or other issues that may arise. Professional technicians have the expertise and equipment to perform thorough cleaning and inspection, ensuring that your lenses remain in top condition and deliver optimal performance.
By following these tips for maintaining clean lenses, you can ensure that your camera equipment continues to produce high-quality images and remains in excellent condition for years to come. Incorporate these practices into your photography routine to preserve the clarity and sharpness of your photographs and protect your investment in quality lenses.
Conclusion
Ensuring the cleanliness of your camera lens is paramount for achieving crisp and vivid photographs. By adhering to the strategies and insights provided in this comprehensive guide, you can guarantee the pristine condition of your lenses, thus enabling the continuous creation of captivating and high-quality images. Whether you’re a seasoned professional or an enthusiastic hobbyist, maintaining your lenses in optimal shape is fundamental to unlocking the full potential of your photographic endeavors. So, embrace these valuable tips and techniques as your go-to resource for preserving the clarity and brilliance of every shot you capture.