Astrophotography is a fascinating pursuit. It allows us to capture the beauty of the cosmos, right from our backyards.
But can you use a mirrorless camera for astrophotography?
The answer is a resounding yes.
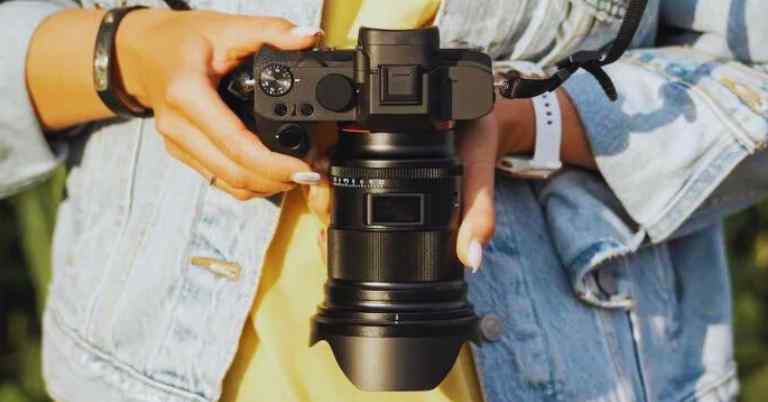
Mirrorless cameras have revolutionized the world of photography. They offer advanced features in a compact, lightweight body. This makes them ideal for astrophotography, where portability and functionality are key.
In this guide, we’ll delve into the world of mirrorless camera astrophotography. We’ll explore why these cameras are a great choice for capturing the night sky.
We’ll also discuss the best DSLR settings for moon photography. These settings can often be applied to mirrorless cameras as well. Understanding these settings will help you capture stunning images of the moon and other celestial bodies.
RELATED TOPICS:
Moreover, we’ll provide insights into affordable camera options. After all, night sky photography shouldn’t be an expensive hobby.
Our target audience includes both amateur and professional photographers. Whether you’re an astrophotography enthusiast or just starting out, this guide is for you.
We’ll cover everything from the basics to advanced techniques. We’ll discuss the role of sensor size, the importance of a sturdy tripod, and the impact of light pollution.
We’ll also share tips on focusing at night, shooting in RAW format, and finding dark sky locations.
By the end of this guide, you’ll be well-equipped to venture into the world of mirrorless camera astrophotography. You’ll have the knowledge to capture the night sky in all its glory.
So, are you ready to explore the cosmos with your mirrorless camera? Let’s get started.
Understanding Astrophotography with Mirrorless Cameras
Astrophotography has grown significantly in popularity. With advancements in technology, capturing the night sky is now more accessible than ever. Mirrorless cameras play a crucial role in this evolution. They are becoming increasingly favored by many enthusiasts.
To understand their appeal, it’s essential to know what astrophotography involves. This form of photography requires capturing low-light conditions and long exposure times. The goal is to photograph stars, planets, and celestial events like meteor showers or eclipses.
Traditionally, DSLRs were the go-to for astrophotographers. However, mirrorless cameras offer several compelling advantages. These cameras provide immediate feedback through electronic viewfinders and are often more compact.
With their advanced features, mirrorless cameras can handle the demands of low-light environments. They often come with higher sensitivity settings, allowing for more effective night sky imaging. Additionally, they enable users to preview their shots instantly.
Weight and size matter a lot in astrophotography. Mirrorless cameras are lighter and more portable compared to DSLRs. This makes them easier to handle, especially when traveling to remote locations for dark skies.
The absence of a mirror mechanism in mirrorless models eliminates shake, resulting in sharper images. This is beneficial for long exposures, a common requirement when photographing stars and planets.
Mirrorless technology continues to evolve. As it does, more astrophotographers are transitioning from DSLRs, seeking the benefits it offers. Ultimately, understanding what makes mirrorless cameras a good choice involves recognizing these numerous advantages.
In summary, mirrorless cameras are a great fit for astrophotography, offering both flexibility and capability. Their growing popularity signifies a shift towards enhanced night sky capture techniques.
What Makes Mirrorless Cameras Suitable for Astrophotography?
Several factors contribute to the suitability of mirrorless cameras for astrophotography. First, their compact design means less bulk when you’re out in the field. This allows for easier mobility and setup.
Mirrorless cameras have an edge in focusing capabilities. They often come with focus peaking features, highlighting the in-focus areas. This ensures sharpness even under dim lighting.
The electronic viewfinder is another crucial component. It lets photographers see in real-time how settings affect the exposure. This instant feedback is invaluable when adjusting to varying light conditions.
Sensor size plays a role in their effectiveness. Many mirrorless cameras boast full-frame sensors, which are excellent for low-light capture. These sensors gather more light and deliver clearer images with less noise.
Moreover, mirrorless systems typically provide better in-body stabilization. This reduces the likelihood of blur caused by minute movements during long exposures. It’s a key advantage for handheld astrophotography, though a tripod is still recommended.
A wide ISO range is also standard in many models. This enables effective shooting in different lighting conditions and enhances flexibility. The ability to increase sensitivity without excessive noise is critical for night sky imaging.
Silent shooting is another benefit, as there’s no mirror to create vibrations. This leads to sharper images, crucial when shooting celestial objects at long exposures. It’s especially useful in quiet environments where shutter noise could disturb wildlife or fellow photographers.
The continuous firmware updates available for mirrorless cameras also enhance their functionality. Manufacturers regularly introduce improvements, ensuring that users get the most out of their gear.
Here’s a quick list of why mirrorless cameras are great for astrophotography:
- Compact and lightweight design
- Electronic viewfinder for real-time adjustments
- Focus peaking for precise focusing
- Wide ISO range for flexibility
- In-body stabilization for sharper images
- Full-frame sensor options
- Regular firmware updates
These features collectively make them ideal tools for capturing the wonders of the night sky. As technology advances, they’ll continue to offer even more advantages for astrophotographers.
Key Features of Mirrorless Cameras for Night Sky Imaging
Mirrorless cameras stand out in night sky imaging due to several defining features. Each feature contributes to their effectiveness and popularity among photographers.
Live view modes and the ability to visualize exposure changes instantaneously are essential. This gives photographers better control over composition and lighting. They can adjust settings in real-time, ensuring optimal exposure for celestial subjects.
Manual focus capabilities are another important aspect. Mirrorless cameras often allow fine-tuning focus by magnifying the live view display. This method ensures that stars and planets appear sharp in the final image.
The advanced sensor technology in these cameras enhances low-light performance. Modern sensors can capture finer details even with minimal illumination. This feature is crucial when photographing in remote locations without artificial light.
Moreover, mirrorless cameras typically boast high-resolution electronic viewfinders. These enable users to preview images with great clarity, which is vital when shooting at night. The clarity helps in assessing the correct settings and composition.
Their wide dynamic range allows for capturing details in both shadows and highlights. This is beneficial when shooting scenes where both the sky and landscape need focus.
Mirrorless models also offer interval shooting and long exposure features. These allow for creative techniques like star trails or time-lapse videos of the night sky.
When it comes to power, mirrorless cameras are efficient with their battery usage. Although they consume more energy than DSLRs due to their electronic viewfinders, many come with extended battery options.
Lastly, many mirrorless cameras now integrate with smartphone apps for remote control. This feature is handy for astrophotographers who need to avoid camera shake during shots. Remote control also facilitates easier adjustment of settings from a distance.
Here’s a summary of key features for night sky imaging:
- Live view mode for real-time adjustments
- High-resolution electronic viewfinder
- Manual focus with live view magnification
- High dynamic range
- Interval shooting and long exposure capabilities
- Smartphone app integration for remote control
These features combine to offer photographers comprehensive tools for capturing stunning astrophotographs. The adaptability and innovation of mirrorless cameras continue to support their rising use in night sky photography.
Best DSLR and Mirrorless Camera Settings for Moon and Stars
Capturing the moon and stars requires specific settings on your DSLR or mirrorless camera. A solid understanding of these can lead to stunning astrophotographs.
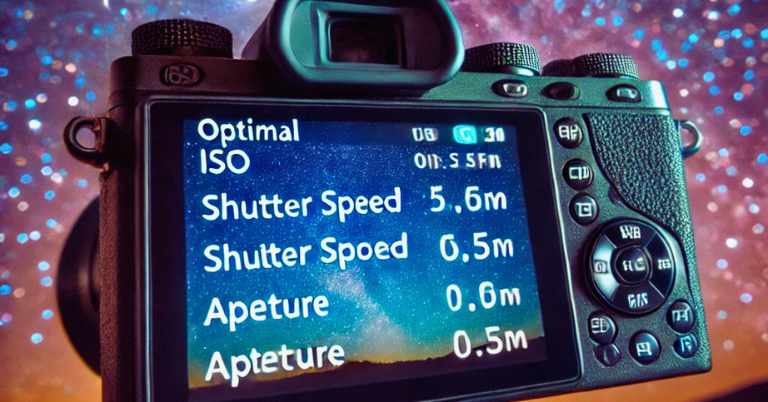
The first step is understanding the camera’s exposure settings. The key components here are aperture, shutter speed, and ISO. Each plays a vital role in how your camera captures the light.
Next, ensure your camera is set to manual mode. This gives you full control over all settings and is crucial for astrophotography. Automatic settings often struggle to get night exposures right.
A wide aperture is essential for night sky photography. An aperture of f/2.8 or wider allows more light into the camera. This setting is particularly beneficial for capturing dim stars.
Adjust the ISO for sensitivity to light. Start with an ISO of 1600 or 3200. These settings let in enough light without introducing too much noise. Remember, higher ISO values can lead to grainy images.
Shutter speed is another critical factor. Use a slower shutter speed to capture more light over time. However, too long an exposure can result in star trails, unless that is the intended effect.
Another vital setting is white balance. Set it to daylight or shoot in RAW format. Shooting RAW allows for post-processing flexibility, which is advantageous when adjusting colors.
Once you’ve adjusted these settings, consider using a remote shutter release. This device helps avoid camera shake during long exposures. Alternatively, use your camera’s timer to minimize movement.
Don’t forget about focus. Manual focus is often more reliable at night. Autofocus systems may struggle in dark conditions, leading to blurry photos.
Here’s a quick list for optimal settings:
- Manual mode
- Aperture: f/2.8 or wider
- ISO: 1600-3200
- Shutter speed: Determined by the 500 Rule
- White balance: Daylight or RAW
- Focus: Manual
- Use a tripod and remote shutter
Adapting these settings based on your specific environment and subject is crucial. Trying different combinations and seeing what works is always a good idea.
Exposure Triangle for Astrophotography
The exposure triangle is fundamental to getting bright, clear astrophotos. It consists of three elements: aperture, shutter speed, and ISO.
The aperture controls the amount of light hitting the camera sensor. A wide aperture, such as f/2.8 or f/4, lets in more light. This setting is crucial because the night sky is dim.
Shutter speed dictates how long the camera sensor is exposed to light. Longer exposures capture more detail in low-light conditions. However, they also risk star trails if too long.
ISO measures the camera’s sensitivity to light. Higher ISO settings increase sensitivity, useful for dark scenes. However, they can introduce noise, reducing image quality.
Balancing these three components is vital. For instance, you might choose a wide aperture and high ISO to use a faster shutter speed. This minimizes star trails while still gathering ample light.
Each component affects the others. Changing one requires adjusting the others to maintain proper exposure.
Here’s a recap list of the exposure triangle:
- Aperture: Controls light entry, impacts depth of field
- Shutter Speed: Time sensor is exposed, affects motion blur
- ISO: Sensitivity level, influences noise
Understanding how these work together is essential for astrophotography. Mastering them helps capture the beauty of the night sky.
Focusing Techniques in the Dark
Focusing at night can be tricky. Normal autofocus systems may not function well without sufficient light. Manual focus becomes a necessity for clear night photos.
Start by setting your lens to manual focus mode. Autofocus can be unreliable when capturing stars or the moon.
To achieve precise focus, use live view on your camera screen. Magnify a bright star to help fine-tune focus. This magnification helps in pinpointing the star’s sharpness.
Next, carefully adjust the focus ring until the star appears crisp. This method ensures that stars remain points of light rather than blurry blobs.
Alternatively, some cameras offer focus peaking. This tool highlights the parts of the scene in focus. It’s particularly useful when focusing on distant celestial objects.
Another approach is to set the lens to infinity focus. This method usually works but may require slight adjustments for perfect sharpness.
To prevent losing focus during shooting, secure the focus ring with tape if necessary. This prevents accidental movement while handling the camera.
Test these techniques before heading out for a session. Practicing focusing in the dark ensures quicker adjustments under real conditions.
Maintain a log of what works best for your setup. Documenting successes and failures helps refine techniques over time.
The 500 Rule and Other Exposure Guidelines
The 500 Rule is a useful guideline for determining the maximum shutter speed. It helps avoid star trails when shooting night skies.
The rule is simple: divide 500 by the focal length of your lens. The result is the maximum exposure time in seconds before stars blur.
For example, with a 24mm lens, use a shutter speed of about 20 seconds. This keeps stars sharp without trailing.
However, consider using shorter exposures for better sharpness. Sometimes 15 seconds or less works better, depending on the conditions.
Consider the declination of the stars you aim to capture. Stars closer to the horizon appear to move faster, which can influence your exposure time choices.
Remember, the 500 Rule is a guideline, not an absolute rule. Experimenting with different exposures can yield varying results.
Here’s a summarized list of exposure guidelines:
- Apply the 500 Rule for base exposure times
- Adjust according to star’s position and movement
- Shorter exposures enhance sharpness
Adapt these practices based on your particular equipment and goals. Exploring various settings helps optimize your night sky photography results.
Equipment Essentials for Mirrorless Camera Astrophotography
Achieving stunning night sky photos requires more than just a camera. Essential equipment enhances the quality and ease of capturing celestial beauty.
First, a sturdy tripod is non-negotiable. It stabilizes your camera during long exposures, preventing blurriness from even slight vibrations.
Remote shutter releases are equally important. They help avoid any camera movement caused by pressing the shutter button manually.
Consider a backpack or bag specifically designed for camera gear. Adequate storage and protection of equipment are essential, especially in rugged locations.
Backup batteries and memory cards should never be overlooked. Night sessions can last hours, and running out of power or storage can cut short your photography.
Also, consider dew shields or heaters. Nighttime moisture can accumulate on lenses, so these accessories keep your gear dry and working.
Think about investing in a headlamp with a red light. This helps you navigate and adjust settings without disrupting your night vision.
Filters, such as light pollution or UV filters, can enhance night-time images. They help reduce unwanted glare or light interference.
A wide-angle lens is a valuable addition to your gear. It allows you to capture broader vistas of the starry sky or the sweeping Milky Way.
Consider these essential items for mirrorless astrophotography:
- Sturdy tripod
- Remote shutter release
- Camera bag/backpack
- Backup batteries and memory cards
- Dew shields or heaters
- Headlamp with red light
- Filters (Light pollution, UV)
- Wide-angle lens
This combination of equipment not only improves image quality but also the entire astrophotography experience.
Choosing the Right Lenses and Accessories
The right lens can dramatically enhance night sky photography. A fast, wide-angle lens is often recommended for this purpose.
Look for lenses with a wide maximum aperture, ideally f/2.8 or wider. This allows more light, crucial for capturing night scenes.
Wide-angle lenses, like those between 14mm and 35mm, offer expansive views. This helps capture the grandeur of the night sky effectively.
Consider primes over zooms. Prime lenses typically offer larger apertures and better optical quality.
Another useful accessory is a lens hood. It helps reduce lens flare from stray light sources, keeping your images sharp and contrast-rich.
Always pack a microfiber cloth. Night dew can quickly fog up a lens, and a cloth ensures clear, clean surfaces.
Lens cleaning kits are valuable. Dust and smudges can ruin detailed astrophotographs, so regular cleaning is essential.
Here’s a list of recommended lens and accessories:
- Fast wide-angle lens (f/2.8 or wider)
- Lens hood
- Microfiber cloth
- Lens cleaning kit
These components not only optimize the image quality but make the shooting process smoother and more efficient.
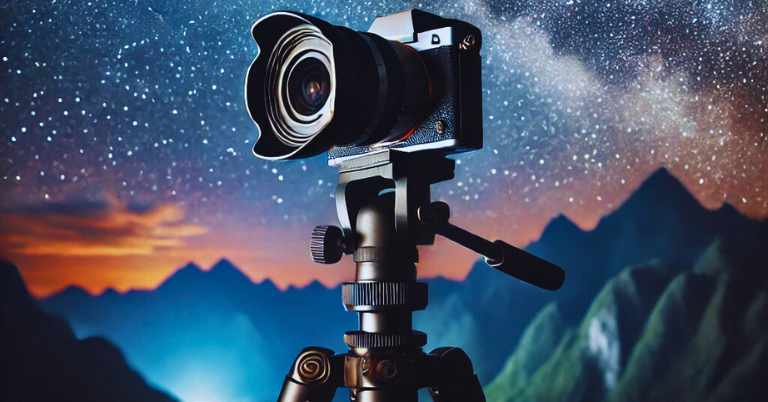
Tripods, Mounts, and Tracking Systems
A good tripod is foundational for stable astrophotography. Look for one that is both sturdy and lightweight for easy transport.
Carbon fiber tripods are excellent. They offer both durability and reduced weight, perfect for extended outdoor sessions.
Ball head mounts provide flexibility in framing shots. They allow quick adjustments to capture the perfect composition.
For longer exposures, consider using a motorized tracking mount. These devices synchronize with Earth’s rotation, keeping stars sharp in longer exposures.
Star trackers are an advanced option for serious astrophotographers. They compensate for Earth’s movement, minimizing star trails and enhancing detail.
Another useful mount accessory is the L-bracket. It allows easy switching between landscape and portrait orientations without moving the tripod.
Choose a tripod with a hook for hanging weights. Adding weight increases stability, particularly useful in windy conditions.
Here’s a list of recommended tripod and mount gear:
- Sturdy, lightweight tripod
- Ball head mount
- Motorized tracking mount
- Star tracker
- L-bracket
- Tripod hook for weights
The right combination of these tools facilitates successful night sky photography, reducing the risk of unwanted blur and enhancing image clarity.
Shooting the Night Sky: A Step-by-Step Guide
Embarking on a night sky photography session involves several key steps. Planning, equipment setup, and execution are all crucial elements.
The first step is preparing your gear. Ensure your camera, lenses, tripod, and accessories are all in top condition before heading out.
Check your battery charge and pack spares. It’s a long night, and you don’t want to cut it short due to power issues.
Find a dark location away from city lights. Light pollution can severely impact the quality of your astrophotographs.
Set up your tripod on a stable surface. Avoid any areas where the ground might be shaky or unstable.
Once you’re set up, adjust your camera settings. Start with basic settings and adjust according to lighting and the subject.
Use manual mode for better control. This allows you to fine-tune the exposure triangle to match conditions.
Focus your lens manually. Autofocus struggles in low light, so rely on manual precision to achieve sharp images.
Utilize live view and magnification to focus on a bright star. This helps ensure clarity in your shot.
Consider the composition, including foreground elements. Including objects like trees or buildings can add interest to your shot.
Take test shots and review them closely. Adjust your settings as needed to achieve the desired effect.
Finally, remember to enjoy the process. Astrophotography is as much about the experience as it is about capturing stars.
Here’s a step-by-step guide:
- Prepare equipment
- Check battery and memory cards
- Find a dark location
- Set up tripod and camera
- Adjust settings and focus
- Consider composition
- Take and review test shots
- Enjoy the process
Following these steps helps ensure a successful astrophotography session and creates great images.
Planning Your Astrophotography Session
Successful astrophotography begins with meticulous planning. It’s important to understand environmental and celestial factors.
Firstly, check the weather forecast. Clear skies with little to no cloud cover are ideal for star photography.
Research the moon phase before you go out. A new moon provides the darkest skies, while a full moon can outshine stars.
Utilize stargazing apps to plan your session. Apps can offer location coordinates and provide forecasts for celestial events.
Determine your location well in advance. Dark sites away from city lights reduce light pollution and enhance star visibility.
Consider scouting your location during the day. This allows you to get familiar with the area and plan potential compositions.
Pack essentials for your safety and comfort. This includes warm clothing, snacks, and a reliable light source for navigating the dark.
Here’s a checklist for planning:
- Check the weather forecast
- Consider the moon phase
- Use stargazing apps
- Choose a dark location
- Scout the area in daylight
- Pack essentials for safety and comfort
Planning effectively takes your astrophotography to a new level, ensuring you’re prepared to capture those perfect celestial moments.

Camera Settings and Techniques for Different Celestial Subjects
Different celestial subjects require different approaches. Tailoring your camera settings enhances the quality of your shots.
For capturing stars, start with a wide aperture (e.g., f/2.8) to let in more light. Set ISO between 1600 to 3200 depending on your camera’s performance.
Adjust the shutter speed using the 500 Rule. Divide 500 by your lens’ focal length to determine the maximum exposure time without trails.
When photographing the moon, reduce the ISO to around 100 or 200. The moon is bright, requiring shorter exposure times.
Experiment with different focal lengths to capture the moon’s details. A telephoto lens can help reveal craters and surface variations.
Shoot in RAW format to preserve as much data as possible. This offers more flexibility during post-processing to correct exposure and enhance details.
Keep in mind the white balance settings. For night sky photography, setting it to daylight or customizing based on the scene can help.
Here’s a list of suggested settings:
- Stars: Wide aperture (f/2.8), ISO 1600-3200, follow the 500 Rule
- Moon: Smaller aperture, lower ISO (100-200), varied focal lengths
- Shoot in RAW
- Consider white balance adjustments
Remember that experimenting with your settings is key. Tweaking them based on the unique conditions of each night can lead to fascinating results.
Post-Processing and Image Stacking for Clarity and Detail
Post-processing is crucial for turning good astrophotographs into great ones. It helps bring out the best in your images by enhancing details and reducing noise.
Image stacking is one effective technique. By layering multiple exposures, you can reduce noise significantly. This approach enhances the overall clarity of the celestial subjects you’re capturing.
Start by shooting in RAW format. This format holds more data than JPEG, offering greater flexibility during editing.
The first step in post-processing is aligning your images. Use software to align the stars in each exposure. Misalignment can reduce the effectiveness of stacking.
Next, stack the aligned images. This process averages out random noise, enhancing the signal-to-noise ratio in the final image.
Adjust contrast and brightness to suit your preferences. Careful adjustments can make your celestial subjects pop against the dark sky.
Color balancing is also important. Subtle changes can bring out natural colors that may be washed out in the original capture.
Think of your image as a raw diamond. Post-processing is the polish it needs to truly shine. Here’s a basic list of steps:
- Align images
- Stack exposures
- Adjust contrast and brightness
- Color balance adjustments
This workflow highlights the beauty of the cosmos. It allows the intricacies of your captured scenes to stand out.
Noise Reduction and Enhancing Details
Reducing noise is a critical aspect of astrophotography post-processing. High ISO settings introduce noise, which can obscure details in your images.
Employ noise reduction tools but use them sparingly. Overuse can result in loss of detail and make the image look artificial.
Consider using selective noise reduction. Target specific areas like the dark sky while preserving details in stars or foreground elements.
Sharpness and detail enhancement can also elevate your photos. Use sharpening tools carefully to avoid introducing halos around bright stars.
Local contrast enhancement can make details more prominent. This involves boosting contrast in small areas without affecting the entire image.
Achieving a balance between noise reduction and detail preservation is essential. It’s a fine line but mastering it can yield stunning results.
Finally, practice makes perfect. Experiment with different techniques and settings to discover what works best for your images.
Software and Tools for Astrophotography Editing
Selecting the right software tools is key to effective astrophotography editing. Many programs are specifically designed for this purpose and offer tailored features.
Adobe Lightroom and Photoshop are popular choices. They provide robust tools for adjusting exposure, color balance, and detail.
For image stacking, try DeepSkyStacker. It’s a free tool that simplifies the stacking process and is beginner-friendly.
Sequator is another choice for stacking. It works well for star trail photography as well as traditional night sky shots.
Astro Pixel Processor is ideal for more complex tasks. It combines stacking and detail enhancement in one package.
Choose software based on your needs and skill level. Some programs are more advanced, while others cater to beginners.
Here is a list of recommended tools:
- Adobe Lightroom and Photoshop
- DeepSkyStacker
- Sequator
- Astro Pixel Processor
In the end, it’s about the right combination of tools and techniques. They can transform your raw captures into captivating celestial imagery.
Affordable Options: Best Cheap Cameras for Night Sky Photography
Astrophotography doesn’t have to break the bank. Many affordable cameras offer fantastic features for night sky photography.
With advancements in technology, even budget models now boast impressive low-light capabilities. These cameras can capture stunning images of stars, the Milky Way, and more.
Mirrorless cameras are especially appealing due to their compact size and lightweight design. These aspects make them easy to transport, perfect for spontaneous night sky shoots.
The key is to look for certain features that enhance night photography. You’ll want good ISO performance, manual control options, and the ability to shoot in RAW.
Several cameras fit the bill without exceeding budget constraints. They deliver great performance with the balance of cost and quality that amateur astrophotographers desire.
When choosing a budget camera, consider the brand’s lens ecosystem. A wide range of affordable lenses can enhance your night sky photography experience.
Don’t overlook second-hand or refurbished camera options. These can offer significant savings while still delivering excellent image quality.
Research reviews and user feedback for insight into how these cameras perform specifically for astrophotography.
There are many affordable choices on the market. However, choosing the right one depends on understanding your specific needs.
A list of affordable cameras includes:
Each offers different strengths, so prioritize features that matter most to your photography style.
Budget-Friendly Mirrorless Cameras for Beginners
Starting in astrophotography doesn’t require high-end gear. Several budget-friendly mirrorless cameras provide excellent capabilities for beginners.
The Canon EOS M50 is a great starter. It has excellent autofocus and can shoot in RAW format, essential for night photography.
Sony’s Alpha a6000 is another strong contender. Its impressive image sensor captures vibrant night skies without much noise.
Fujifilm’s X-T200 offers unique film simulation modes. These can give your night sky photos a distinct look with minimal post-editing.
Nikon’s Z50 is designed with easy handling in mind. It’s lightweight yet sturdy, perfect for carrying on those long night treks.
When selecting a camera, think about available lenses. Interchangeable lenses offer flexibility, allowing you to experiment with different sky subjects.
Consider a camera’s ease of use. Beginner-friendly interfaces can help you quickly learn astrophotography basics.
Here’s a list of starter-friendly mirrorless cameras:
- Canon EOS M50
- Sony Alpha a6000
- Fujifilm X-T200
- Nikon Z50
These options provide quality night shots without overwhelming complexity.
What to Look for in a Low-Cost Astrophotography Camera
Buying a low-cost camera for astrophotography involves knowing which features matter. Not all specs are critical for shooting the night sky.
A key feature is sensor sensitivity. Cameras that handle high ISO settings produce less noise in low light.
Manual control is essential. It allows you to adjust aperture, shutter speed, and ISO according to the lighting conditions.
Check for RAW shooting capability. RAW files hold more information for editing, which is vital for astrophotography.
Consider the camera’s size and weight. A compact design is easier to transport and handle during prolonged night shoots.
Battery life is another critical factor. Longer battery life means more shooting time, crucial when capturing time-consuming exposures.
Lens compatibility matters too. Look for cameras with an extensive selection of lenses that fit your budget.
The list of features includes:
- High ISO performance
- Manual controls
- RAW shooting capability
- Compact size and weight
- Long battery life
- Lens compatibility
Focusing on these features helps you make an informed choice, ensuring your investment supports your astrophotography goals.
Embracing the Night Sky with Your Mirrorless Camera
Astrophotography can be incredibly fulfilling. Mirrorless cameras offer a fantastic way to explore this genre.
They combine portability with advanced features. This makes them perfect for capturing celestial wonders.
Embrace the beauty of the universe with your camera. Each session will bring its own challenges and triumphs.
Enjoy the process. The night sky is vast and magnificent, waiting for you to document its splendor.
Final Tips and Best Practices
To maximize your astrophotography efforts, consider several best practices. These can greatly enhance your shooting experience and results.
First, plan your sessions well. Know your location, weather, and celestial events in advance.
Master your camera settings. Ensure you understand how to use manual controls effectively.
A list of final tips includes:
- Always shoot in RAW.
- Use a sturdy tripod.
- Keep your lens and sensor clean.
- Prioritize noise reduction techniques.
- Practice focusing at night.
Following these tips will help you capture stunning images of the night sky, every time.
Encouragement for Continuous Learning and Experimentation
Astrophotography is a journey filled with learning. Every session teaches something new about the night sky and photography itself.
Don’t be afraid to experiment. Trying different techniques and settings is key to finding what works best for you.
Join astrophotography communities online or in-person. Sharing experiences can provide valuable insights and inspiration.
Keep pushing your creative boundaries. The possibilities are as infinite as the cosmos.
In the vastness of the universe, you’ll find endless opportunities to grow and refine your skills. Enjoy every moment of it.